Amazon associates have had some gripes with the free WordPress.com (WP) site. WP places some technical restrictions on blog features in order to
- prevent nasty people turning WP into an anti-security weapons platform, and to
- prevent the avaricious from turning WP into the scam capitol of the world.
This, unfortunately breaks some of the shiny tools that Amazon provides to their associates. This is neither good nor bad, it’s just an unfortunate collision between two companies with mismatched goals.
Here are my personal notes for adding an Amazon associate link to a WordPress.com blog. It doesn’t look as nice as the other Amazon tools, but it’s completely functional. I’m placing them in a public space for others’ benefit.
The Familiar Part
The following should be familiar.
- Log into your Amazon Affiliate account.
- Click on “Build Link/Widgets”.
- Click on “Product Links”.
- Search for the product you desire to showcase.
- Click on the corresponding “Get HTML” button.
At this point, you cannot use the fancy “Text an Image (Enhanced Display)” option. WordPress.com will automatically strip out the floating “iframe” code. The iframe code allows Amazon to insert its web content into a rectangle on your screen.
The next best thing is to use the “Image Only (Basic Display)” option. You’ll need an extra couple of steps to get this to work — but it will work.
Copy the Picture to Your Blog
- Under “1. Select Link Type”, click on “Image Only (Basic Display)”. Wait for your browser to refresh.

Illustration for Step 1. - Copy the HTML displayed in the box below, and paste it into your blog article. Keep moving; we’re not done yet.
- We need to upload the picture into your WordPress blog. Right click on the picture of your item, and save the image to you hard drive. Mac OS X users can simply drag and drop. Note! Do not change the name of the file. The name will be long and ugly, but that’s how it is in the HTML that you copied into your blog article in the previous step. (True geeks, yes, you may hack the HTML if you wish. You know how.)
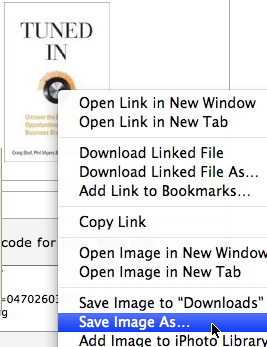
Illustration for Step 3. - In your WordPress.com blog, click on the “Add Media” picture button. If you’re not sure which is the picture button, hold the mouse over the first icon. A balloon will appear saying “Add an Image”.

Illustration for Step 4. - Click on the “Choose files to upload” button.
- Select the picture’s file.
- Give appropriate text in the “Caption” and “Description” boxes.
The Tricky Part
Here’s the tricky part. We have some objectives:
- Fix the Amazon.com HTML so the picture appears and the associate link works.
- Upload the picture to WordPress.com
- Prevent WordPress.com from inserting new HTML.
Here are the steps to do that.
- Look in the “Link URL” box. This displays the URL of the picture after it is uploaded. Highlight, then copy everything.

Illustration for Step 1. - Click on “Save all changes”. Do not click on “Insert into Post”!

Illustration for Step 2. - You’ll see the screen clear, and the word “Saved” appear. It doesn’t stand out very well, but if you see it, then all is well.

Illustration for Step 3. - Close the file upload screen by clicking on the small “X” in the upper right.

Illustration for Step 4. - Go to the HTML code that you copied and pasted from Amazon.com. Locate the HTML for the picture. It begins with:
<img border="0" src="
It may also look like:
<img src="
The variations don’t matter. The important thing is the src="…" part.
- Notice that the name of the picture file comes immediately after that last quotation mark ("). Highlight everything up to (but not including) the next quotation mark (").

Illustration for Step 6. - Paste the missing HTML in (1) above.

Illustration for Step 7. - Now save your draft and check it. You’ll know that you have it right if you (1) see the picture, and (2) see the Amazon.com preview come up when you hover over the picture.

Illustration for Step 8.
You did it!
Extras
I was asked, “How do I get the picture to justify right, left, or center?”
That’s a great question. In HTML, pictures start with the text:
<img
Options appear (separated by spaces) afterwards. Finally, the end of the picture is denoted by a single right angle bracked (>) also known as a “greater than sign”.
To cause the picture to center, make the starting text look like:
<img align="center"
Remember to ensure that a space follows the final double quote (“).
To cause the picture to stick to the left side of the text, use:
<img align="left"
And finally, to cause the picture to stick to the right side of the text, use:
<img align="right"
A (Maybe) Helpful Tool
You may also want to try a free helpful tool for fixing Amazon associate links.
Edits:
- 2008-0703
- Made corrections and simplifications.
Post Script: The WordPress.com restrictions only exist on the free WordPress.com blog hosting service. The restrictions do not exist on sites that run their own personal WordPress.org installations. (Note the .com vs. .org difference.)
This specific article is licensed under a Creative Commons Attribution-Noncommercial-Share Alike License. Click the link for details.
